


An Overview of Linode's Images Service
Traducciones al EspañolEstamos traduciendo nuestros guías y tutoriales al Español. Es posible que usted esté viendo una traducción generada automáticamente. Estamos trabajando con traductores profesionales para verificar las traducciones de nuestro sitio web. Este proyecto es un trabajo en curso.
Linode’s Images service allows users to store custom disk images in the Cloud preconfigured with the exact software and settings required for certain applications and workloads. These Images can be quickly deployed to new or existing Linode, saving users time from manually setting up their entire system after each deployment.
Pricing and Availability
NotePricing change: Starting on September 1, 2021, Custom Images has transitioned to a paid service with a cost of $0.10/GB per month for each Custom Image stored on an account. Recovery Images, generated automatically after a Linode is deleted, will continue to be provided at no cost. See Images > Pricing for additional details.
Custom Images cost $0.10/GB per month and are available across all regions.
Types of Images
All Images stored on your Account are visible from the main Images page within the Cloud Manager. Images are divided between two tables: Custom Images and Recovery Images.
Custom Images: Images that are manually created by a user on the account. These Images were either captured from an existing Linode’s disk or uploaded from an image file. Custom Images do not expire and will remain on the account until they are manually deleted.
Recovery Images: Temporary Images that are automatically created when a Linode is deleted (provided the Linode has been active for at least 12 hours). Recovery Images have a defined expiration date and, once expired, will automatically be deleted. The expiration timeline is typically equal to the number of hours the Linode was active, up to 7 days.
Creating a New Image
Two different methods can be used to manually create a Custom Image, each of which is discussed within this guide:
Capturing an Image
Requirements and Considerations
Disk must be formatted using ext3/ext4 filesystems. Images cannot be created if you are using raw disks or disks that have been formatted using custom filesystems. CoreOS disk images are in RAW format. Images made from CoreOS disks can’t be used to deploy new Linodes.
Power off Linode to avoid database corruption. If your Linode is running any active databases, it’s recommended to power off the Linode down prior to creating the image. Creating an image that includes a running database can cause corruption or data loss in the imaged copy of the database.
Only the selected disk is saved to the Image. The Image is comprised only of the disk selected during the creation process. The Image does not store other aspects of the Linode, such as Configuration Profiles, Block Storage Volumes, IP Addresses, and other Linode-based settings.
Additional overall limits of the Images service are outlined within the Limits section below.
Capturing an Image through the Cloud Manager
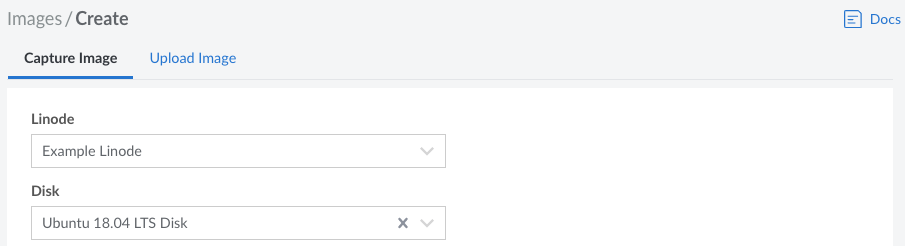
Log in to the Cloud Manager and open the Capture Image form by navigating to the Images page, clicking the Create Image button, and staying on the Catpure Image tab.
Select your Linode and Disk from their respective dropdown lists and type in an optional Label and Description for the Image. If no Label is entered, the label for the disk will be used. When selecting a Linode and Disk, keep in mind any limitations that may prevent the Image from creating successfully.

Click the Create button to start creating the Image. It will take some time to fully complete. You can check the status of this process by navigating to the main Images page, finding the new image in the Custom Images table, and looking at the Status column. If the Image has been captured and processed, the status should be set to Ready. The Size of the Image is based on the disk’s usage, not the size of the disk itself.


Uploading an Image
Requirements
Raw disk image: The image file must be a raw disk image (
.img). Other file formats will not work.Compressed using gzip: The image file must be compressed using gzip (
.gz) before uploading it. Other compression algorithms are not compatible.Maximum file size is 5GB: The maximum size for an image file is 5GB (compressed).
Maximum image size is 6GB: The maximum uncompressed size of each custom image is 6GB.
Pricing considerations: Custom Images are billed based on the uncompressed size of the uploaded image file.
For compatibility, use unpartitioned disks formatted with ext3 or ext4 file systems: Network Helper and other Linode Helpers are compatible with non-partitioned image files formatted using the ext3 or ext4 file systems. Partitioned disks and other file systems may be used, but some manual configuration may be required.
Creating or Obtaining an Image File
Creating a custom image file is typically a complex process intended for advanced system administrators. In most cases, users will be better suited creating a custom image directly from an existing Linode (see Capture an Image) or through the Linode Packer Builder (see How to Use the Linode Packer Builder). These two methods ensure maximum compatibility with Linode and are easier to follow for a novice user.
If you do intend on creating a custom image file to upload, here are a few methods to get you started. Depending on how you obtain or generate the image, the image or image file may need further configuration so it can be used with the Image Upload feature on Linode. Keep in mind all of the requirements and considerations listed above.
- Existing Image: Use a compatible image from your own on-premise environment, existing cloud provider, or through an online repository (such as a distribution’s official image repository).
- Packer: Use Packer’s
QEMU Builder to automate the creation of custom images. Within the
.jsonconfiguration file for your image, set"accelerator": "kvm"and"format": "raw". If running Packer inside of a virtual machine, the hypervisor needs to support nested virtualization. dd: Install and configure an operating system on a local, remote, or virtualized system and create a disk image using theddcommand-line tool.- QEMU disk image utility: Use the QEMU disk image utility to create the image.
Compressing the Image File
After the image file has been created, it needs to be compressed using the gzip utility.
Linux and macOS: Run the following command, replacing [file.img.gz] with the file name of your image. See Archiving and Compressing files with GNU Tar and GNU Zip for additional information on gzip.
gzip [file.img] [file.img.gz]Windows: Use a third party tool that supports gzip compression, such as 7-Zip.
Determining the Uncompressed File Size
Knowing the uncompressed size of an image file is helpful for planning the storage requirements of Linodes deployed using that image. This information also ensures you stay within the limits of the Images service. The best way to determine the uncompressed size of a gzip archive is to uncompress that archive and then examine its file size. Alternatively, use the zcat utility by run the following command, replacing [file.img.gz] with the file name of your image.
zcat [file.img.gz] | wc -cUploading an Image through the Cloud Manager
Once you have obtained a compatible image file that meets all the requirements, upload it through the Upload Image Cloud Manager form. After it’s uploaded, you can then deploy Linodes using that Custom Image.
Log in to the Cloud Manager and open the Upload Image form by navigating to the Images page, clicking the Create Image button, and selecting the Upload Image tab.
Type in the Label of the new Image along with an optional Description. Select the Region you would like the Image to be created within. Since Images can be deployed to any data center (regardless of where they are located), it’s recommended that you select the one closest to you geographically for the fastest upload speed.
Specify the image file you’d like to use by either dragging the file into the designated area or by clicking the Browse Files button and selecting the file. The filename will appear along with a progress bar indicating the percentage completed for the file upload.
Once the image file has been successfully uploaded, the Custom Image is created and the Cloud Manager will redirect you to the main Images page. Here, you should see the new Custom Image listed along with a status of Pending Upload. Once the Custom Image is ready to be deployed, the status will change to Ready.

If there is an error when processing the uploaded image file, the newly created Image may be deleted and an error message will be written to the Events log. See Understanding Events and the Activity Feed for more details on viewing Cloud Manager Events.


Managing Images
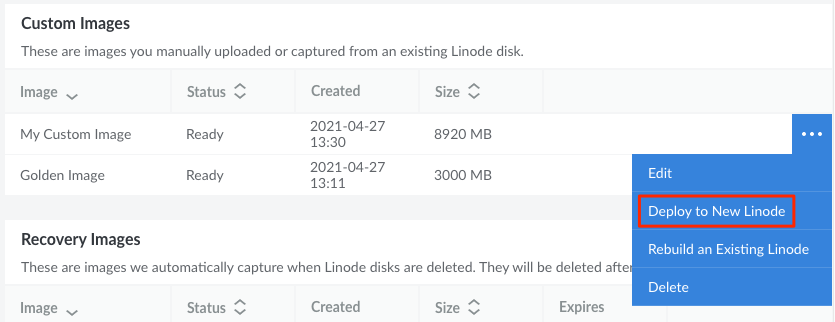
To take action on an Image, locate the Image within the Images page of the Cloud Manager and click the corresponding ellipsis options menu. From here, there are a few actions that can be initiated:
- Edit: Change the Label and Description for the Image.
- Deploy to a New Linode: Create a new Linode using the Image.
- Deploy to an Existing Linode: Rebuild the Linode using the Image.
- Delete: Delete the Image (cannot be undone).
Deploying an Image to a New Linode
Log in to the Cloud Manager and navigate to the Images page.
On this page, locate the Image you wish to deploy and click the corresponding ellipsis options menu. Select Deploy to a New Linode.

You are redirected to the Create Linode form with the chosen Image preselected. Complete the remainder of this form, making sure to select your desired Region, Linode Plan, Label, Root Password, and any other options that may be needed. See Getting Started with Linode → Create Linode for full instructions on creating a Linode.
Click the Create Linode button to create the Linode based on the selected Image.

Rebuilding and Deploying an Image to an Existing Linode
Log in to the Cloud Manager and navigate to the Images page.
On this page, locate the Image you wish to deploy and click the corresponding ellipsis options menu. Select Rebuild an Existing Linode.

You are redirected to the dashboard page for that Linode and the Rebuild form is displayed with the chosen Image preselected. Complete the remainder of this form, making sure to select your desired Root Password, and any other options that may be needed. See Rescue and Rebuild → Rebuilding for full instructions on rebuilding a Linode.
Click the Rebuild Linode button to rebuild the Linode. All existing disks will be deleted and a new disk will be created using the selected Image.


Limits
- Image size limit: The maximum size for each Custom Image is 6 GB.
- Account storage limit: The maximum combined size for all Custom Images on an account is 150 GB.
- Account quantity limit: There can be up to 25 Custom Images per account.
Additional requirements and considerations apply when capturing an Image from a Linode and uploading an Image from a file.
This page was originally published on